DIY Range Hood for a Modern European Kitchen

DIY Range Hood for a Modern European Kitchen
My favorite kitchen style is a vintage European styled kitchen. I love the old-world finishes and touches. The use of wood to add warmth and comfort to a kitchen space is perfect, in my opinion. So, even though I have a transitional kitchen, I can still add touches of another style. I designed my range hood and stained it a worn wood finish that was inspired by a vintage European kitchen. Some of my decor and accessories add a hint of this style as well and my kitchen is finally looking closer to my preferred style.
Of course, I have a few things I’d like to still change and update (like the pantry), but I’m taking my time and enjoying the process. Does your kitchen have a range hood, cabinetry, or a microwave above the stovetop? Updating or creating a range hood is an affordable update to add a lot of character and focus to your kitchen space. My first attempt to design and create a range hood ended with a partial prototype and a lot of frustration. I needed to start with a good design and one that I loved the look of – not just one that I could probably make. Here’s a before picture of our kitchen with cabinetry above the range.

Here’s another ‘before’ photo to see a wider view of the open concept kitchen. This also shows the wall separating the kitchen and dining room which now has a built-in plate rack on it.

My first attempt at creating a range hood wasn’t focused on a hood design that I loved, but on a design that I thought I could achieve. And when I tried to use scrap wood to create a prototype, the first design wasn’t even easy to create. After at least six months of not thinking about the hood design, I was putting away dishes and suddenly an idea came to mind. The box concept that I used to design Quinn’s hidden wall art cabinet inspired my range hood design, so I started to build another hood cover. Here are two photos of the cabinet doors removed.


Now, the design idea was pretty simple and straightforward. Create a box and then a lid. The troubleshooting came when I had to figure out how to install the lid. Our vent hood was accessible by the cabinet doors. If there is ever an issue or we need to replace the vent someday, we need to easily access it. I brainstormed for days with my brilliant husband who thinks about a lot of things I don’t. He also tends to overcomplicate things, but that’s one thing that makes us good at brainstorming together – we’re a good mix of ideas. The lid needed to go on after the box was installed and it needed to be able to be removed if necessary. Cabinet hinges seemed like the obvious answer, but a hinge that supported the size and weight of our lid would be costly (over $200 just to access the vent). We ended up using a super heavy duty set of hinges and used nuts and bolts to attach the lid to the top of the box, but the hinge doesn’t actually give us total access because it was installed inside the box/lid (it barely pulls open). However, if we need to access the vent, we can just unscrew the nuts at the top of the box and pull the lid downward. It’s not fancy, but it does the trick, and it was the cheap and strong option.

The new DIY range hood design was pretty simple, and the European inspired front was just perfect for my taste, but there were a lot of steps to create the new hood, so I created a YouTube video to show the process and steps I took to create this vintage European kitchen inspired range hood cover. The hood cover front weighs about 20 lbs. and is made using pine boards, and sande plywood. The box is made from select pine boards and some common boards inside the box that I used to mount it to our existing cabinetry. Mounting the new box to our cabintry was scary, but I took extra time and attention to make sure that I only screwed into the front face board that already had drill marks from the cabinet door hinges. I measured twice, marked my spots, used painter’s tape to guide me, drilled pilot holes to avoid splitting the wood, and it worked out perfectly.
Watch the video tutorial here
The video doesn’t show me cutting the inside common boards that were used to attach the box to the cabinet, but in the video I hope you can still see that there are four inside boards with notched cut outs for it to fit onto the cabinet around the shelving. I used wood screws spaced out and kept it basic but strong. I also added a horizontal board inside the box to support some of the weight of the box by resting on the bottom of the top cabinet. This not only adds weight support and stability, but it also allowed me to install the box without a helper holding the box in place. The box could be set onto and into the cabinet without screws to just see how it would look and fit, and then to install it. This horizontal support was my husband’s idea and it worked out perfectly.
Shop this post
This post may contain affiliate links. This means I may receive a small commission from each purchase, at no cost to you. As an Amazon Associate, I may also earn from qualifying purchases. Thank you for using my links to help keep this blog going!


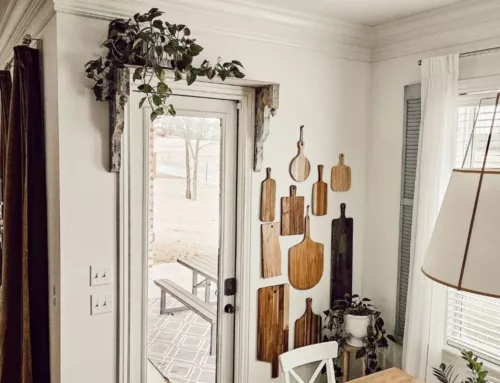
With the addition of a vintage European inspired range hood, all my wooden cutting boards looked a bit much. There was just too much wood in one place and it looked cluttered. So, I decided to install a little cutting board wall, in the dining nook, which keeps them close to the kitchen and adds some warmth and interest to this cozy little corner. I just love cutting board walls, but I enjoyed the cutting board collection so much behind the stove that there was never a need for a wall too. So, I’m pretty happy that now I get to enjoy a cutting board wall.


The new range hood is better than I imagined, and I love the contrast, warmth, and style it adds to our kitchen. The idea to create a cutting board wall gallery came to me the morning before a luncheon, so with a few nails, this fun wall gallery practically installed itself. If you have a small wall in the kitchen or nook and you’re not sure what to do with it, maybe consider a cutting board gallery – they add so much character. I’m so happy with my latest kitchen updates and still can’t believe I built that range hood cover. If I can build this, you can too. I hope you’re inspired to look at your spaces in a new way and know that step by step, you can create a beautiful space that fits your needs and style too.
POSTED IN: DIY Projects
Let's be friends!
Related Posts
Search
Categories
Subscribe
Get the latest posts, discounts, and design inspiration right to your inbox.
