DIY Plate Rack Accent Wall

DIY Plate Rack Accent Wall
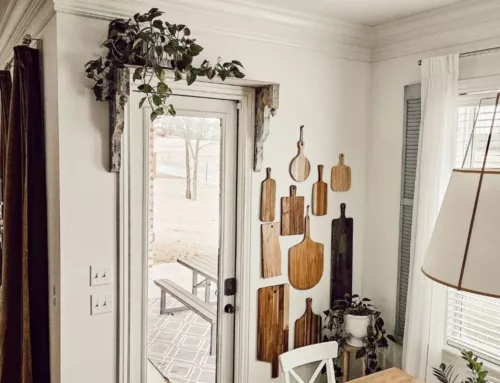
Have you seen these wall plate racks? I just love them, but I didn’t want one constructed permanently onto the wall. So, I decided to build a removeable one and now it can be moved somewhere else or sold if I’m ever done with it. This wall treatment is a wonderful way to display items and add some interest to your wall. The wall plate rack was popular and common back in the 1950s and 60s, but it’s been making a comeback for a while now.
This wall treatment works with so many styles because you can design the rack to look cohesive with your style. You can make it rustic, farmhouse, cottagecore, traditional, contemporary, vintage, and even modern. I’m excited to decorate this space for the holidays and even use it to show off Quinn’s artwork. There are so many ways to decorate a wall plate rack, but before you can do the fun part of decorating, you first have to build the thing.
You will find several lovely and inspirational wall plate racks on Pinterest, but they’re all built onto the wall. That’s a lot of nails and holes. So, I decided to use pocket hole construction to build the rack off the wall first and then install it with just four screws. It doesn’t lay perfectly flush with my wall (because my walls aren’t even), but I’m OK with that because I did not want it permanently built onto the wall. The great thing about a wall plate rack is that it can be any size for your space or needs. I have this wall between the kitchen and dining room with nothing but light switches and an outlet. Placing art on this wall never looked right to me, but using it for the plate rack makes me happy.
You can paint or stain your wood to create a wall plate rack that coordinates with your style. You could even add a brass gallery railing if you wanted something more refined. The possibilities are endless. I went with my simple worn wood stain and kept the wall Alabaster white. I have some fun ideas to change up the backdrop of the wall in the future, but again nothing permanent. For now, I’m enjoying the simplicity and warmth the wood adds to our white walls.
There is a YouTube video to show you the process of the build and installation. I didn’t even need help attaching it to the wall because the rack is fairly light weight and I used scrap wood to lift it to the correct height. My biggest tip for this very affordable wall plate rack build is to measure your space and consider outlets, light switches, doors, and even traffic by the wall. I used a piece of graph paper to sketch my design and created a cut list for the wood. Doing this step makes the build fast and easy.
Video tutorial:
This wall plate rack was a spontaneous build. I was looking into the kitchen thinking about another project and the wall was sort of bothering me. I brainstormed different possibilities and loved the plate rack idea. The style adds to our home, the decor adds interest to the space, and it’s really just a fun addition that’s not the typical wall art you’d expect to see. I hope this post is inspiring to you and if you have any questions or comments, please send them to me. Below, is the wall before the new plate rack was installed. It’s the dividing wall in between the kitchen and dining room. It’s full of light switches and an outlet.

The wall was not a focal point at all, but now it takes a little spotlight and adds functionality to this space. I love that the styled plate rack adds beauty and camouflage for all the switches. The benefits to construct the plate rack with pocket holes outweighs the benefits of building the rack onto the wall, but our walls aren’t perfectly flat so there is some light that shines through between the wall and the side boards. I’m OK with it, but wanted to share that detail in case you’re considering pocket holes or a built-in.


You can see in the photo above just how low profile the plate rack is. It not only takes up little space, but it’s not difficult to get accustomed to walking by and around. Our family is enjoying the addition, and no one has complained about difficulties using the light switches.


This plate rack has vintage roots that I love, it’s a unique way to display decor, and it can be easily moved (my favorite part)! I also considered the corner of our kitchen nook for the plate rack, but that’s the bird’s corner, so maybe someday. A plate rack could also be used to display framed photos or a set of dishes. If you want to display dishes, I recommend adding a rut on the shelf for the plate to rest in (I’d use a Dremel tool). Thanks so much for checking out this post, I hope my project inspires you to add beauty and function to your walls too.
POSTED IN: DIY Projects
Let's be friends!
Related Posts
Search
Categories
Subscribe
Get the latest posts, discounts, and design inspiration right to your inbox.
