How to DIY Fabric Wallpaper

How to DIY Fabric Wallpaper
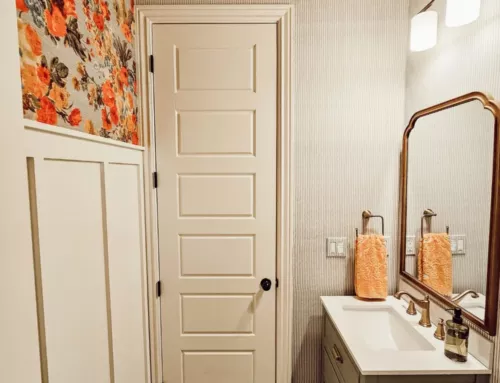
Our powder bathroom is small, but it’s a great space to add a splash of color in our home. When I added the board and batten wall treatment to the entryway nook, I continued the treatment into the powder bathroom which left the wall above it a blank canvas. So next, I installed a temporary book page faux wallpaper treatment and enjoyed the look of it for a while. This space has been primarily neutral and simple up until now. Instead of spending hundreds of dollars on wallpaper, I spent $36 on fabric and liquid starch. I’m so excited to show you how to DIY fabric wallpaper, that can also be easily removed.
I’ve seen this wall treatment done on a closet wall, a coffee bar backsplash, and a focal wall. I knew that I didn’t want to deal with seams, so that limited me to finding a wide enough fabric to cover the width of the bathroom wall. This led me to shopping for upholstery fabric, and both JoAnn’s and Hobby Lobby were having sales. The fabric I selected has a watercolor tapestry feel to it, and while it’s fairly bright, it has some of my favorite bright colors in it. The great thing about this wall treatment is that it’s temporary and easy to remove when I’m ready for a change.
At first, I was skeptical that liquid starch could actually hold the fabric onto the wall, but when you roll a coating of starch onto the wall and then roll more over the fabric until saturated, it stuck with no problems. Since liquid starch isn’t a true adhesive, it can be carefully peeled off after spraying the fabric with water. You can then wash the fabric and use it for a new project (mine will become a tablecloth some day). The installation process is very fast and easy for any skill level. It was a lot easier than installing wallpaper.

To start this project, use painter’s tape around the border to protect the walls from liquid starch. Be sure to also lay down protective plastic for the floor and any other surfaces that may get starch dripped on it. Then, I tacked the fabric across the top of the wall making sure it was even and smooth. Then to get the fabric out of my way, I pinned each corner of the fabric ends to the ceiling. Use pushpins so that you can easily get them out. Then roll liquid starch across the top of the wall about a foot down, untack the corners of fabric pinned to the ceiling and smooth it over the wall. Once smooth, roll more liquid starch over the fabric about a foot down. The plan was to let it dry before continuing on, but it wasn’t necessary to wait.


Like I mentioned before, the process goes quickly and it’s really easy. I took my time and whenever the starch didn’t cause the fabric to instantly stick or lay flat, I just used more starch to saturate the fabric until it was smooth and stuck to the wall. I had no idea if this technique was going to work or not, so I took my time and figured out a rhythm. I brought a wallpaper scraper to help smooth out the fabric, but it wasn’t necessary. If your fabric has wrinkles or creases, be sure to iron them out prior to installation. I’m not entirely sure if just rolling starch over wrinkles is enough to flatten them out on the wall.


The starch took longer to dry than I expected, but I left it to dry overnight and then it was ready to finish up the next morning. The entire border of my fabric was not entirely attached to the wall. I used pushpins to help, but it needed additional starch. So, the next step is to use a drywall taping knife around the entire border edge where wall meets wall and use it to guide your razor blade utility knife as you cut a straight line around the edge of the wall. As soon as the blade gets dull, snap off the dull blade and push the new blade up a bit so it’s ready to cut. I love these affordable retractable razor blades, I used them to trim my wallpaper mural.

Once the excess fabric is nicely trimmed around the border, take a brush and add more liquid starch to the edges until they lay flat and stick to the wall. If you have threads coming undone or coming off, try to brush them smooth to the wall to blend in before just clipping it off. Whichever method causes the least disturbance to the fabric’s straight edge is the best. Before the starch dries around the edge, remove the painter’s tape, and wipe off any starch from the surrounding walls and ceiling. I took my time in applying the starch, so my walls were OK.

If the edges of your fabric aren’t straight and you need to hide it, you can add a line of caulk once the fabric and wall are completely dry. I’m going to skip this step for my walls because the edge looks pretty good.
The YouTube video showing the process is fairly short and simple because the actual process is pretty short and simple too. But sometimes it helps to watch how to do something versus just reading the steps. I think this wall treatment is great, it’s more affordable and less technical than wallpaper, and it’s easy to install and remove. I hope this project inspires you and be sure to let me know if you have any questions.
Note: My wall is not textured, but I don’t think an orange peel texture would make a difference. My wall was painted and should be since you don’t want liquid starch directly rolled onto unfinished drywall. Be sure to patch and paint any holes prior to applying the fabric.
Here’s a link to the HGTV Home fabric, Garden Odyssey. I love the thickness of the fabric, the texture reminds me a bit of grass cloth, and I love the large watercolor floral design. I typically lean towards linear and symmetrical designs, but I like the asymmetrical design for this wall treatment – there was no issue with making sure the design was level and straight. And when I get tired of it, it comes off easily with just some water and no damage to my walls.
Shop this post:

This post may contain affiliate links. This means I may receive a small commission from each purchase, at no cost to you. As an Amazon Associate, I may also earn from qualifying purchases. Thank you for using my links to help keep this blog going!
Video tutorial:
Thank you so much for checking out this post! I cannot believe how easy this installation was and how beautiful the wall turned out. I have more projects planned for this little space and I hope you’ll join me along the way. Be sure to sign up for my free email subscription and get updates on new blog posts and videos.
POSTED IN: DIY Projects
Let's be friends!
Related Posts
Search
Categories
Subscribe
Get the latest posts, discounts, and design inspiration right to your inbox.
